
COVID-19 Decontamination Toolkit
Extend the life of your masks using UV-C light
As a design studio, we wanted to put our resources and network towards COVID-19 critical challenges. We made a call-out and 130 volunteers came forth to offer their skills, in addition to dozens of medical healthcare workers and people on the frontline who shared their stories. More background info here.
[Update] Thanks to a pre-commercial contract provided by RVO, we have recently shipped several units to hospitals across Uganda as part of a pilot programme.
Due to the current crisis, there is a clear and urgent lack of personal protective equipment (PPE), particularly face masks of various kinds. As a result, standardised protocols are changing and increasingly substitute masks are being used in healthcare situations. However, these are less effective, unregulated and untrusted by most healthcare staff.
After significant research and interviews with healthcare workers, we have designed an open-source COVID-19 Decontamination Toolkit using UV-C light, with readily available parts, clear building instructions, and a protocol to run the setup. The goal is to give individuals and organisations who are in need of such equipment the opportunity to extend the life of their precious resources, and stay safe for longer.
Overview
We designed this toolkit so that almost anyone can build their own, using standard components that can be ordered online. Our setup here is based on IKEA's KUGGIS box, though most opaque boxes with a lid can work. We provide a custom-built online calculator to help you assess how long to decontaminate for based on your box size and the power of your UV-C lightbulb.
Extensive available research shows that widely obtainable UV-C lightbulbs are proven to decontaminate in many contexts. [Update] We have sent our prototype to the HygCen Lab in Germany, who has performed a screening test on some exemplary masks using the Bovine Coronavirus BCoV. The results of the disinfection process showed that the required reduction of the test virus Bovine Coronavirus by ≥ 4lg steps could be achieved in 8 minutes within the specific test procedures performed. You can download the report.
We're also providing 3D printable parts that ease the usage and room for error, but assembly without any 3D printed parts is also an option.
Important
The building of, and use of this setup, should be considered a last resort (i.e. decontaminating PPE should occur only when the supply at your location is no longer adequate for demand).
UV-C light is harmful to both eyes and skin and must be handled with great caution.
This approach is not certified, and FROLIC studio is neither manufacturer of the product, nor can be held responsible for the building, use, quality or performance of the setup made by users of these guidelines. This setup has not undergone any of the tests required of a medical device in normal contexts.
This is an open source project licensed under CERN-OHL-P v2.
See our References section below to read more about our research.
Operating instructions (protocol)
[1.] Set up your room
We recommend the box be placed in a well ventilated, "clean room" where no other contaminated equipment is handled and to which no unauthorised personnel have access.

[2.] Retrieve new mask from supply stock
All types of mask are eligible for decontamination, but they won’t all last the same number of cleaning cycles. Some might degrade and lose their physical strength over time. For more info, see section below.

[3.] Personalise your mask with your info
Write your name and date of first use on visible part with a permanent marker. This will help you recognise your own mask in the future and track how long you have been using it.

[4.] Use mask according to guidelines
Follow the advised instructions for usage and removal of your mask. The World Health Organisation (WHO) and the Center for Disease Control and Prevention (CDC) have illustrated those guidelines in a very visual way here. Among them:
Clean hands with soap and water or an alcohol-based hand sanitiser before and after touching or adjusting the mask.
Avoid touching the inside of the mask.
Fit it snugly on the face, nose and below chin using a pair of clean (non-sterile) gloves.
Perform a user seal check.
Remove by grasping the ties or elastics and avoid touching the front.

[5.] Assess if mask is suitable for reuse
After use, visually inspect the mask to determine if its integrity has been compromised. Dispose of the mask if you see:
Residue that can not be wiped off with your fingers
Punctures or tears
Fluid stains

[6.] Transport mask to decontamination box
Take mask to box immediately after use to avoid cross-contamination. Hold the mask via the straps or give it to the person responsible for collection and sanitation in your organisation.
We don’t recommend losing track of your mask or saving it for later before decontamination.

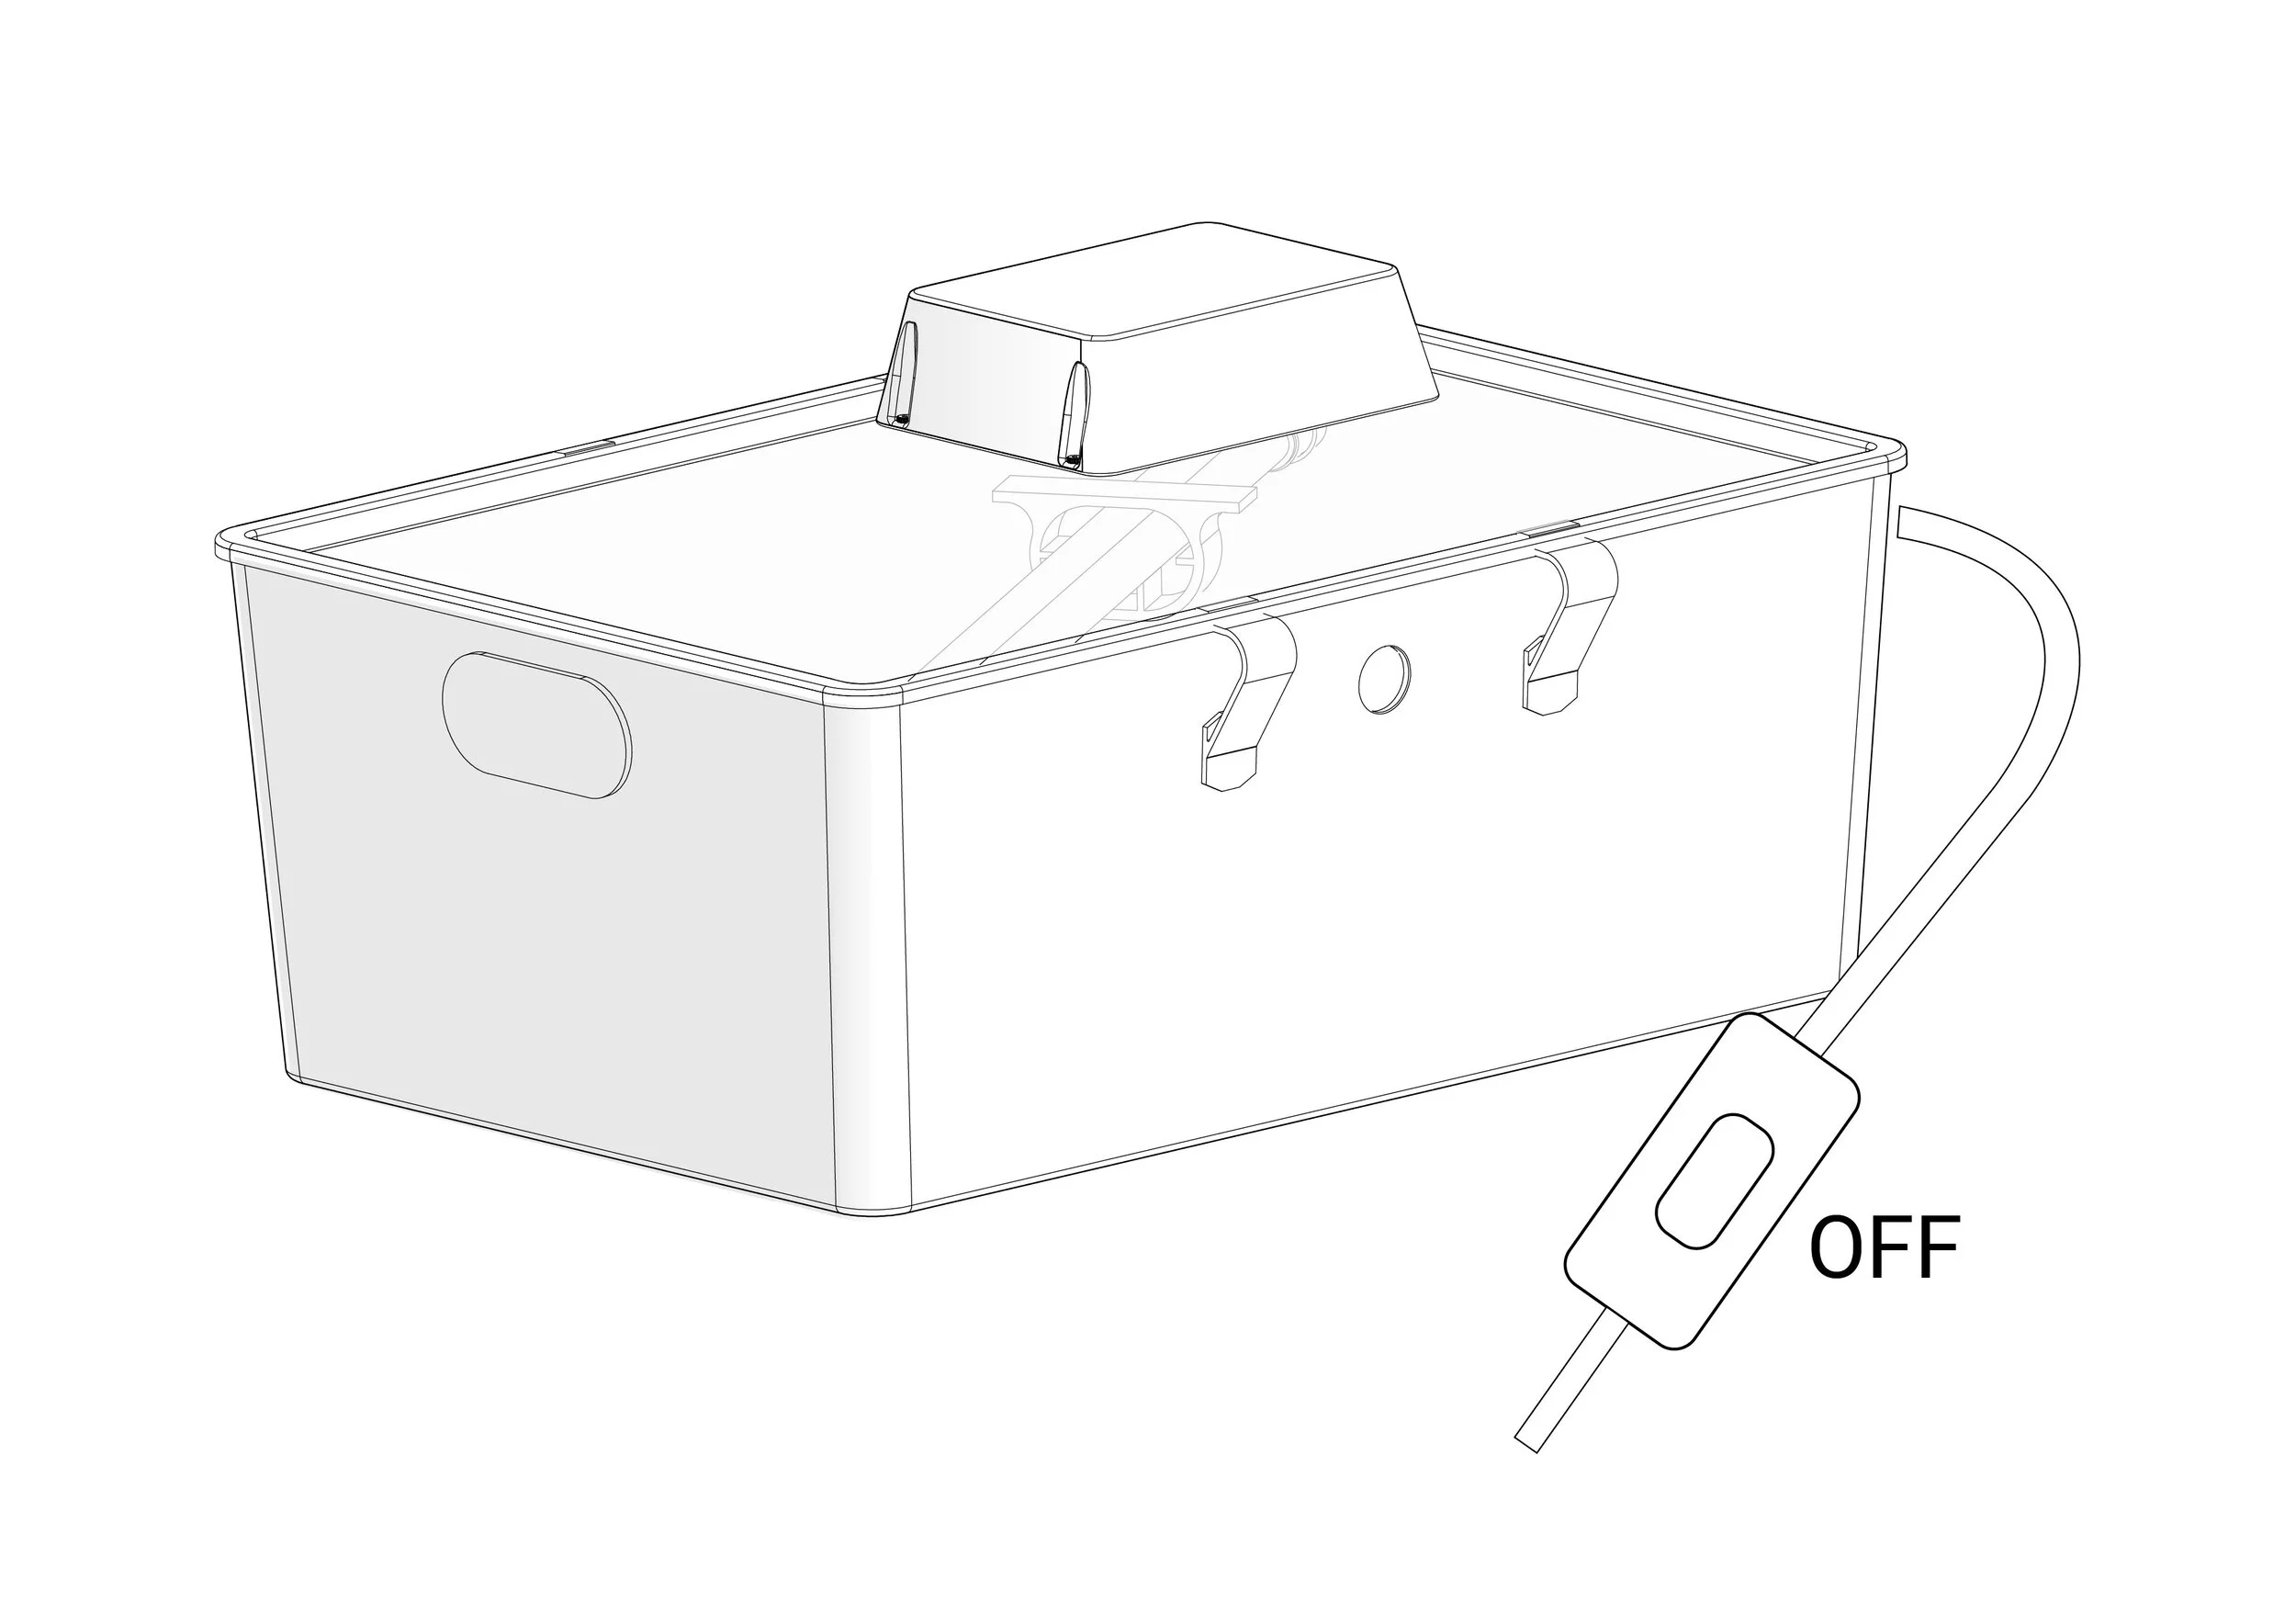
[7.] Open the box
Before opening, make sure light is OFF. Place lid upside down to avoid breaking the bulb.

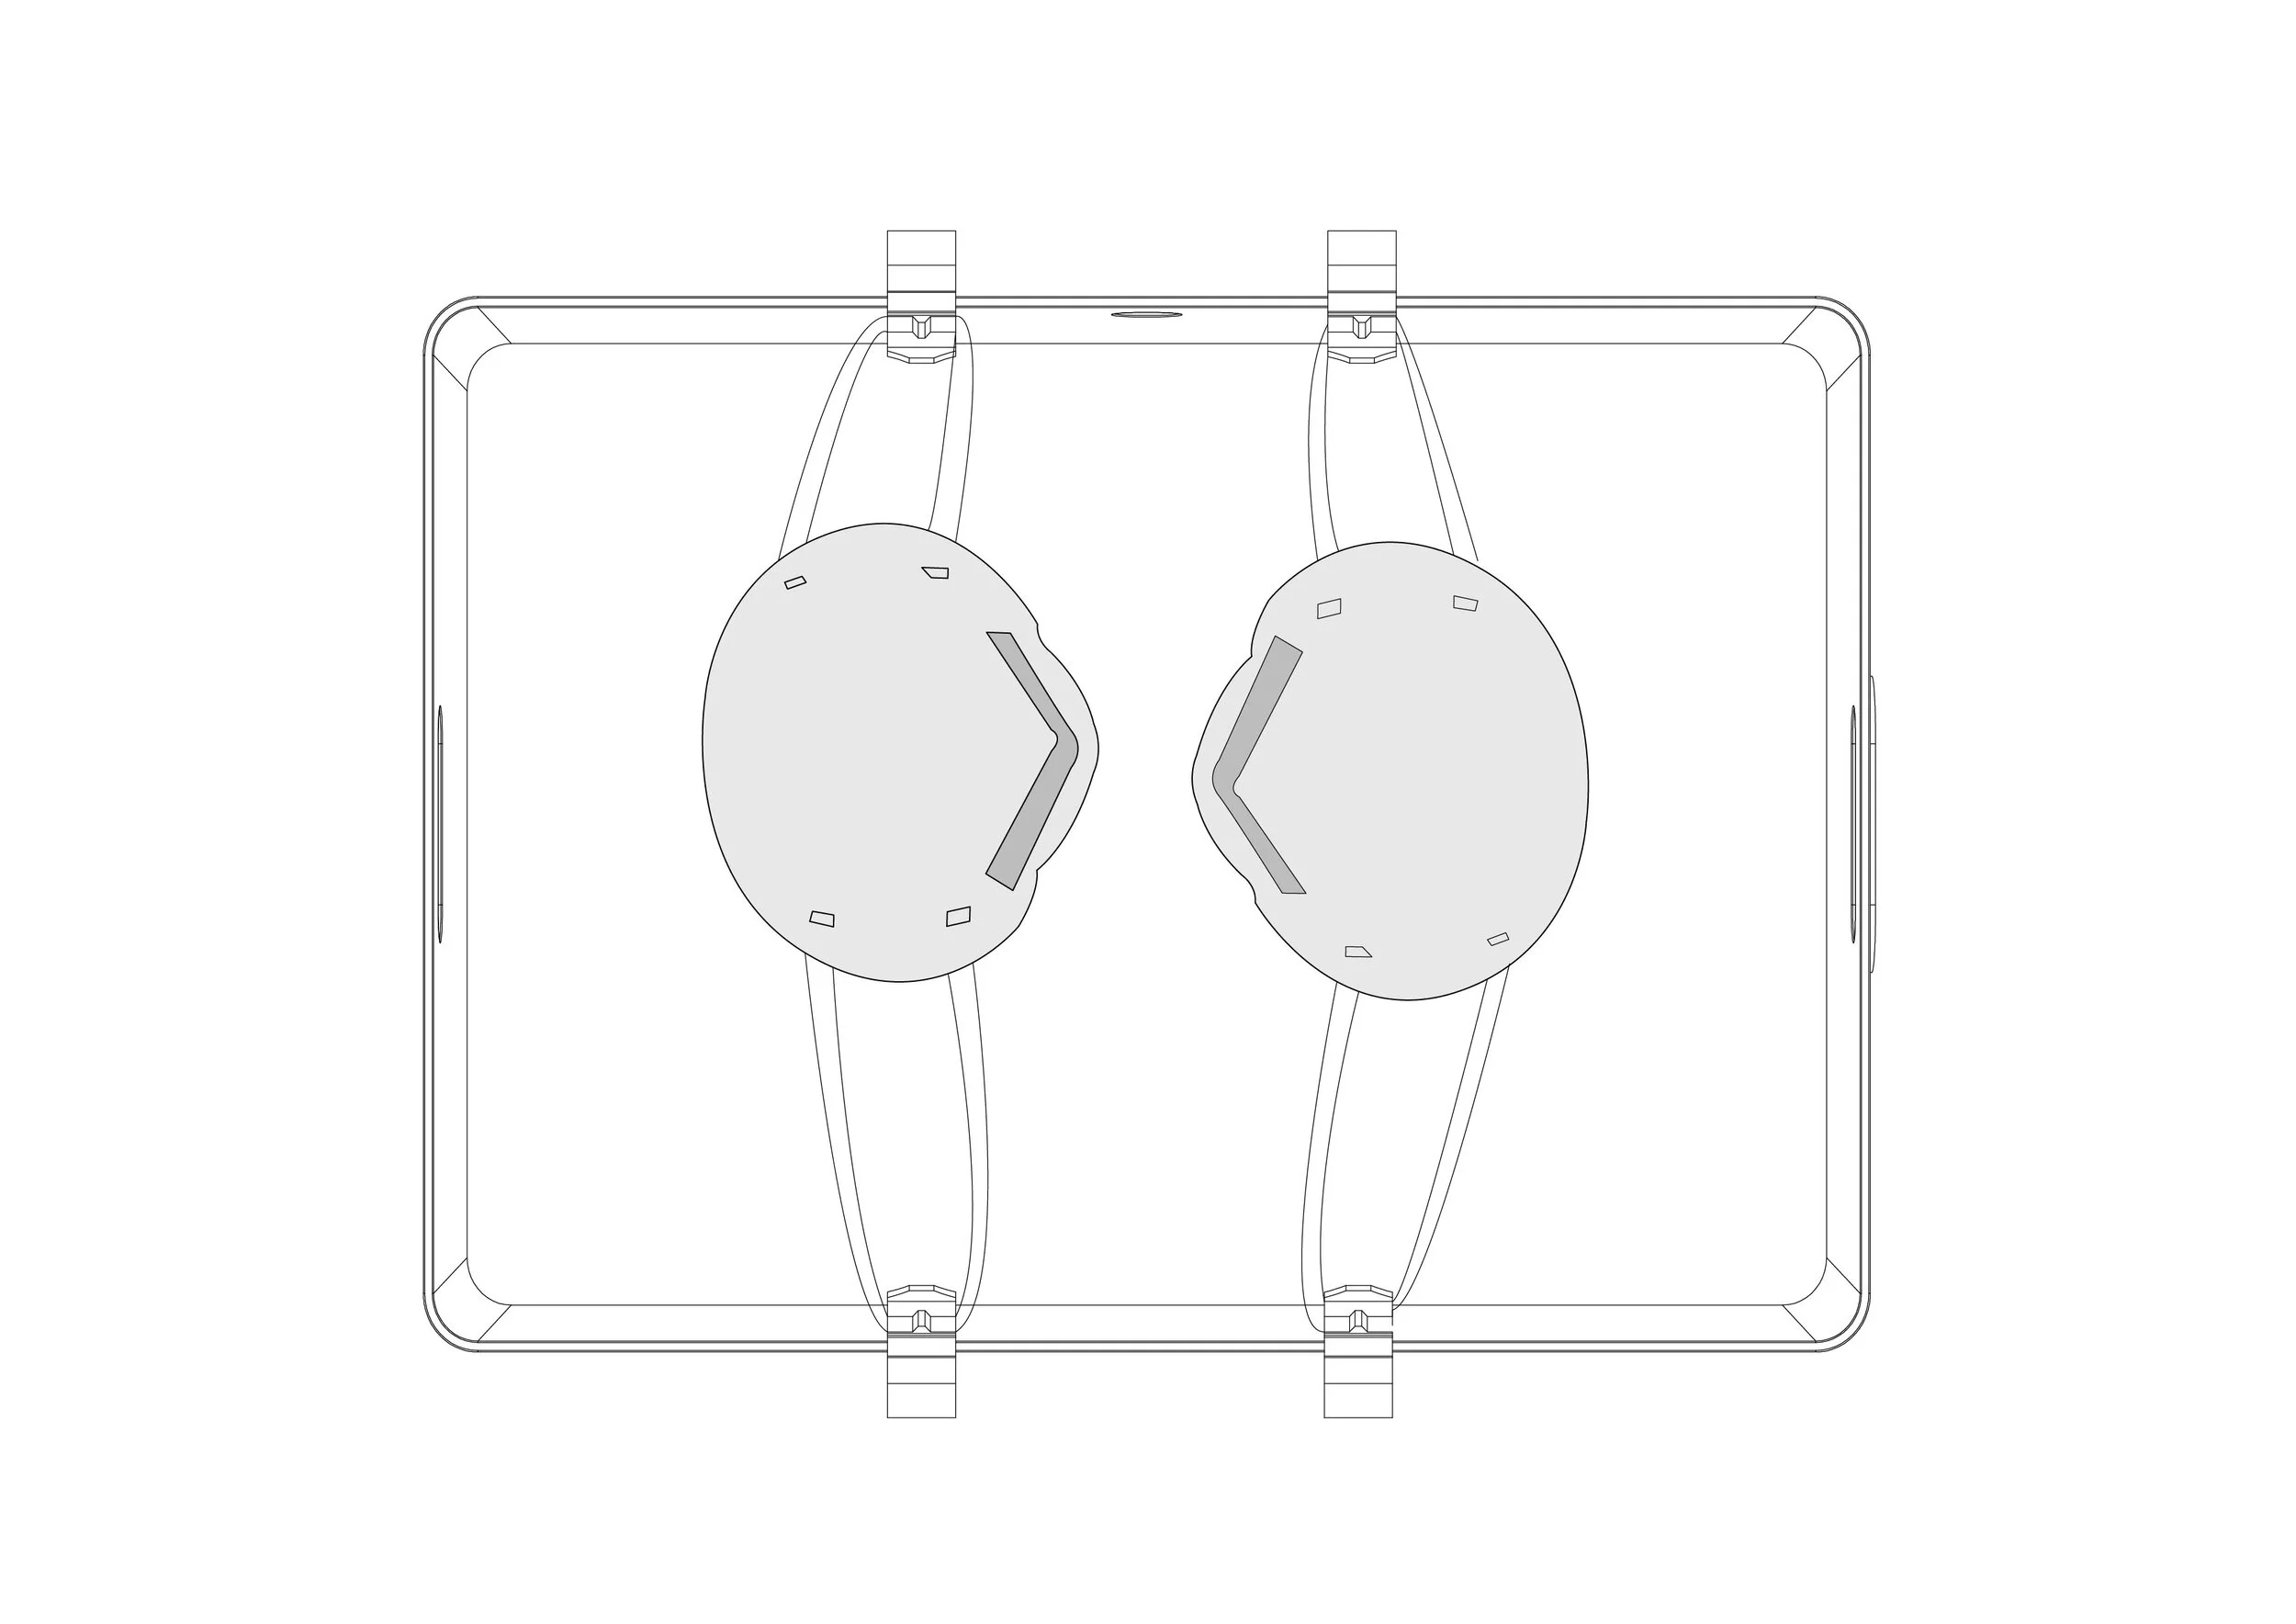
[8.] Attach the mask to the hooks inside the box
In case of multiple masks, make sure they don't touch each other to avoid hiding areas from UV-C light.
[9.] Close the box and switch light ON
You can see through the holes whether or not the light is ON. Ensure that no direct light leaks through holes and other openings. If it does, cover these openings with a piece of transparent plastic, glass or regular paper that you might have at hand (find more info and alternative materials here).
If you don't have time to wait, make sure someone else is overseeing the process.

[10.] Wait for the minimum cycle time
Decontamination time can vary. Respect the minimum cycle time written on the label glued to the box. If you are unsure, contact the person responsible (written on the label), or use the online calculator to find out how long the cycle should be based on your setup (found in the building instructions).
Avoid running cycles that are longer than necessary. Longer cycles will degrade the quality of the masks.

[11.] Clean hands and box
Thoroughly wash your hands as indicated in this video. Also disinfect the outside of the box, including cable and switch, using suitable disinfectant products such as OXI wipes, alcohol, bleach, etc.
Remember that keeping the sanitation products at hand next to the box can be a good reminder for people to actually use them and prevent the decontamination box from becoming a source of contamination.

[12.] Switch light OFF before opening the box
UV-C light can cause damage to your eyes and skin, so avoid direct contact. In our step-by-step building manual we provide instructions on how to install a safety switch. If your kit does not include one, pay extra attention on making sure you don’t open the box before switching the light OFF.
[13.] Open box and retrieve de-contaminated mask
Place lid upside down to avoid breaking the bulb.

[14.] Re-assess mask usability
Perform another visual inspection to check if the integrity of any section of your mask is compromised. Perform another user seal check and dispose of the mask if:
You see punctures or tears.
Fitting is loose - it does not seal around your mouth, nose and chin.

[15.] Update label on mask
Add a mark with a permanent marker to indicate that the mask has gone through a new decontamination cycle. If you are not reusing the mask immediately, store it in a safe space according to your organisation's policy.

PDF overview
You can download an overview of the protocol (filename: protocol.pdf).
Which types of mask are eligible for disinfection and how many times can they be cleaned?
It is important to understand that there are different types of masks available on the market. Although UV-C has been shown to inactivate coronaviruses from various models of N95 FFR masks, not all of them keep their integrity and safety capabilities after multiple decontamination loops. Research safely suggests that mask’s performance is not reduced between 1 and 3 cleaning cycles, and up to dozens of cycles of low UV-C levels could be performed without significant damage to the mask. In any case, visible physical degradation would likely occur before loss of filtration capacity, so for as a long as the masks stays intact, filtering capabilities remain.
For masks made of cloth (cotton and others), we recommend laundering instead of using UV-C light. Washing thoroughly with hot water and soap is an effective method for killing the virus and cloth masks, unlike N95 masks, are suitable for this.
Build your own decontamination box
Please let us know if you make one! You can email us at covid-19@frolicstudio.com. We would love to hear stories of who made it and where it’s being used.
Time and cost
To build this box (for the first time) we expect you need about one hour of your time and the material cost for one full setup is around 50,- to 70,- euros.
Required equipment
We have tried to keep this as simple and adaptable as possible for contexts. Therefore you have some freedom to source what is available to you, and then you can use our online calculator so that you can assess the length of a decontamination cycle based on your own setup.
Below we describe the setup that we have developed with the specific materials we sourced, but you can find a list of alternative materials and equipment here.
Tools

Drill
Drill bits: 4mm and 8mm
Screwdriver
Pliers
Wire cutter
Hobby knife or scissor
Marker
Ruler (optional)
Tape measure (optional)
Wire stripper (optional)
Hot glue gun (optional)
Paper printer (optional)
3D printer (optional)
Solder + solder iron (optional)
Materials
Insulation Tape
Glue - hot glue or contact glue, needs to be suitable for plastic
Spray Mount or double sided tape
Metal wire (if not using 3D-printer)
Bolts M3, 14 mm
Nuts M3
Parts

Box with lid
UV-C light is harmful to the eyes and skin and must be contained. You can use any closed, opaque, box. However the following instructions are based on our setup using IKEA’s KUGGIS box.
our setup:

Top 55 watt, bottom 24 watt
UV-C lightbulb
The time required in order to decontaminate your masks will be in relation to the power of this lightbulb. For our setup we use a 55 watt bulb, which is quite common, but you could use a less powerful one. They are often used for water sanitation in aquariums and ponds and are referred to as germicidal lamps. It should be as long as possible when placed diagonally on the box.
It is vital that you use a lamp that has a wavelength of 254nm (UV-C). Other wavelengths do not have the germicidal effect and will not work. Also ensure that you use ozone-free bulbs (which is usually standard).
Our setup:
Electrical Ballast
An electrical ballast is needed to power the lightbulb - this converts the electricity from the mains to a level that is suitable for the lightbulb. These come in many different shapes and sizes, but it’s important that you match it to the lightbulb used (you must ensure the wattage of the bulb matches the wattage of the ballast).
Our setup:
Socket/Base
We are using 4-pin PL-L light bulbs. These need to be connected to a 2G11 socket/base to power the light, and are widely available to source.
Our setup:
Electric wire (±1 metre)
To connect the socket/base to the ballast we need about 1 metre of electrical wire. Since this wire will be used in different parts of the box, it is easiest to buy multiple colours of standard electrical wire to differentiate between them easily. Make sure your wire is rated for the right voltage.
Our setup:
Wired power plug
This is needed to plug in to the power supply, we strongly recommend to get one with a switch (such as for a lamp).
Our setup:
Reflective material (± 1,5m x 0.5m)
To increase the spread of the light to reach all parts of the mask, place reflective material (a type of metal foil) inside of the box. We used radiator foil, a plastic foil with a thin layer of aluminium, and is more durable than normal aluminium foil.
Our setup:
Safety switch (optional, but highly recommended!)
Safety switch that turns off the light automatically when the box is opened, as UV-C is harmful to both eyes and skin.
Our setup:
Step-by-step instructions
The following instructional guide may seem daunting and long, but with a basic understanding of electrical wiring, building the box is quite easy when you follow each step. There are additional illustrations and video tutorials to help you through the process.
Download
First download this folder, which includes everything you will need:

PDFs to print
Protocol
UV-C warning label
Minimum cycle time
Lightbulb attachment drilling guide sheet
Safety switch drilling guide sheet
Schematic for wiring info

Design files to 3D print (optional)
If you have access to a 3D printer, you can use the designs we modelled for “our setup” but these parts can work on other boxes too.
Box to cover the transformer (to hide away any potentially dangerous wires).
Hooks to place the masks in the optimal position in the box.
Bracket for the lightbulb (to support and protect it).
Bracket for the safety switch.
Assemble
[STEP 1] Stick reflective material
Cut the reflective material to the right size of the inside of the box.
Stick the material to the inside of the box (don’t forget the underside of the lid). Spray mount or double sided tape works well.
If you’re using the same material as our setup (radiator foil) then most likely it’s letting some light through the box’s holes while being safe for your eyes. If you can’t see through the box, you can make a hole cover with a piece of transparent plastic, glass or regular paper that you might have at hand (find more info and alternative materials here).
Important: don't use mirrors, the glass or acrylic in mirrors blocks the UV light from being reflected.
[STEP 2] Mounting the light
Print the drilling guide sheet on A4 (filename: DrillingGuide_01.pdf).
Do not scale, so make sure it’s printed on 100%!
Place the paper in a way that the light will be in the middle of your box. You can use tape to hold it in place, but the idea is that you can remove it if you want after you drill the holes.
Drill the holes following the guide sheet. You will need both 4mm and 8mm drill bits.
Remove the guide sheet.
[STEP 3] Wiring the light
For the following steps, having this schematic will be handy:
Use two different colours of wire and cut two ±20cm pieces of each colour.
Strip the tips of the wires.
Connect the wires to the socket of the light. If it’s numbered, then connect one colour to 1 and 2, and the other colour to 3 and 4. If it’s not numbered, then check the supplier’s tech sheet.
Feed the wires from the bottom of the lid through the big holes (8mm) using the same colour wire through each hole.
Use the bolts to loosely attach the socket.
Connect the lightbulb’s bracket. Ideally, use the 3D printed version we made (filename: Bracket.stl) Or you can use a metal wire. Make sure to keep the wire loose so that the light doesn’t rest against the lid as it gets warm.
Use bolts to loosely attach the bracket.
[STEP 4] Mounting and wiring the ballast
Place your ballast close to the where the wires are coming out of the lid to keep things tidy.
Use a marker to mark the points where you will drill holes to attach the ballast.
Drill 4mm holes.
Use bolts to loosely attach the ballast.
Trim the wires to the right length so that they reach the ballast comfortably.
Strip the ends.
Connect the wires to the ballast where there are 4 inputs, make sure to keep the colours as pairs (next to each other).
[STEP 5a] Wiring the power
If your power cable doesn’t come already stripped, then strip the ends.
For cables with only two wires, connect them to Live and Neutral (colour doesn’t matter). If your cable has got three wires, then make sure to also connect earth (colour here does matter, often green or yellow-green).
Now it’s time to tighten all your bolts properly.
Connect your lightbulb (either direction is fine).
If you used a metal wire rather than our custom 3D printed bracket, double check that the light is loose enough so that it doesn’t rest against the lid as it gets warm.
Cover any exposed wires with insulation tape.
Cover holes and loose wires with masking tape.
We created a custom 3D printed casing (filename: Cover.stl) that fits around all the loose parts neatly. this is designed for a similar ballast to ours.
Finally, close the box.
Plug in the light and test it (do not switch on light without enclosing it in the box as it will damage your eyes and skin!!)
[STEP 5b] Safety switch (optional but recommended!)
Drill holes:
Print the drilling guide sheet in A4 (filename: DrillingGuide_02.pdf).
Do not scale, so make sure it’s printed on 100%!
Unplug the light!
Remove the lightbulb!
Place the guide sheet as close to the edge as possible and close to the ballast. If using the KUGGIS box, then the paper can be placed in the corner.
Drill the 4mm and 8mm holes (if not using our 3D printed bracket then only drill the 8mm hole).
Wire and solder:
Strip the end of the power cable by about 10cm (so the two wires are free).
Feed one of the wires through the hole starting from the top of the lid.
Connect it to the middle pin of the switch.
Take another piece of wire of about 10cm (same colour as the wire you fed through the hole).
Connect it to the pin closest to where the metal part of the switch hinges.
Solder each wire to the pins.
Use isolation tape to protect any live wires.
Ideally, use the 3D printed bracket we created (filename: Switch.stl) and glue the switch into the bracket. The hinged part should be facing the inside of the box when the lid is closed. Bolt the bracket to the lid. If not using the 3D printed bracket then glue the safety switch on the edge of the lid.
Close the lid to check that the switch is correctly placed (it should move the metal piece).
Connect the wires to the ballast as you did it previously in Step 5a.
Close the box.
Plug in the light and test it by opening and closing the box (it should switch off when open), protect your eyes when testing this.
[STEP 6] Final touches - stickers and hooks
Print on A4 the protocol (filename: Protocol.pdf), warning sticker (filename: UVC-Warning.pdf) and Minimum Cycle Time stickers (filename: MinimumCycleTime.pdf).
On the Minimum Cycle Time sticker, add the time you need to run the decontamination for (using the calculator below), a contact name and phone number.
Place the stickers as seen on the main images.
Cover them with a plastic layer (to protect them when cleaning the box) and tape them. You can use milo sheets or folder sheets, even transparent tape over them should do the trick.
Place hooks to attach the masks. You can use our 3d printable designs or use any suitable hooks. You could also drill your own hooks into the box.
Calculator
Use the calculator to calculate how long you need to run the cycle to ensure you have decontaminated your PPE properly. This gives you the freedom to use a different setup to ours.

This calculator assumes a minimum dosage of 1000mJ/cm2 for each object placed in the box, and a light bulb efficiency of 28%. Click here for our rationale of the calculation itself. [Updated minimum dosage, 29/04]
Contact
You can email covid-19@frolicstudio.com for any questions, contributions/updates, collaborations, etc. We will try find the time to respond to everyone, though there’s a chance that we may not be able to if there is a large volume. Know that we will read each message carefully.
If you are using or you have built this setup, we strongly recommend that you leave us your email so that we can reach you if new information/updates need to be communicated. We will only contact you in relation to this project and not for any marketing reasons.
Match-making
We understand that not everyone has access to the right components/skills/time for building their own decontamination box. So we are assessing the need for a “match-making service” to pair people who can make the box, with those who need one made.
You can sign up to either list below:
We are also interested in hearing from people who have made or are using this setup! Do send your experiences and photos to covid-19@frolicstudio.com, or share with us on social media.
Open source notification and license
Copyright FROLIC studio 2020.
You may redistribute and modify this source under the terms of the CERN-OHL-P v2. (https://cern.ch/cern-ohl). This source is distributed WITHOUT ANY EXPRESS OR IMPLIED WARRANTY, INCLUDING OF MERCHANTABILITY, SATISFACTORY QUALITY AND FITNESS FOR A PARTICULAR PURPOSE.
Please see the CERN-OHL-P v2 for applicable conditions.
FAQ’s
How do I know it is working properly?
If you follow the instructions and input the right data into the calculator, we trust the decontamination is done properly to a very high degree. This is based on both our well documented technical research as well as the laboratory tests the device was subjected to. Please visit the data sheet of your UVC bulbs for more information
How do I maintain it?
Once assembled, the decontamination toolkit does not require a lot of maintenance. Important things to keep in mind are:
Make sure you don’t leave it ON for longer than needed.
Make sure that the reflective material is in place and re-glue if it starts coming off (this could happen with high temperatures).
When in standby, close the lid to prevent exposing the bulb to damage.
What are the safety considerations? I read that UVC light can be harmful
We have incorporated as many safety measures as we can, including a switch that automatically turns OFF the light when the box is open, reducing the risk of unwanted exposure. By covering any holes in the box with protective material such as paper as indicated here, you also guarantee protection from the light, whilst still being able to see if the device is working.
What if I leave it ON for too long?
We have tested this by placing a digital thermometer inside the box for half an hour and observe that, after a few minutes, the temperature does not rise above the 35ºC. However, that will depend on the lightbulb you are using as well as the type of box.
There is always a risk of the box losing its shape, melting or even catching fire if light remains ON for hours. Plus, the masks will degrade very quickly if exposed to UV light for too long. That’s why we strongly recommend that you avoid running cycles that are longer than necessary, never leave the box unattended and that you use your phone or a kitchen timer as a reminder.
I don’t have a 3D printer. Can I build the box anyway?
We have designed a handful of 3D printed parts to optimise the setup, but you can build a version of this box with only commercial parts and some traditional tools that almost everyone has to hand.
I don’t have any tools available. What can I do?
There are a minimum number of tools necessary for assembling the decontamination box, such as a power drill, a screwdriver and some pliers. If neither you nor your neighbour have them, you can look for a workshop in your vicinity where these tools can be borrowed or rented. You could also find a helping hand in some of the FabLabs or other maker spaces in your city, which probably have the capacity to produce the optional 3D printed parts for you as well.
I don’t have an IKEA box. Can I build a similar system with a different model?
Any closed container is suitable to turn into a decontamination tool, as long as it can stand the heat generated by the UVC light inside. It does not have to be an IKEA box, but any storage box with a lid will do. Please look at the instructions carefully and find more info on alternative equipment here.
Can I scale it up and turn it into a bigger sanitation tool?
Yes. But remember that the minimum amount of exposure required for the mask to be safely disinfected increases exponentially with the size of the box/container.
Can I use the box to decontaminate other items like parcels?
In theory, the device can be used to decontaminate any material as long as it is properly exposed to the light (i.e. with no areas in shadow). Similar commercial solutions for disinfecting keys and mobile phones can be found on the market. However, we have adapted the box to fit protective masks, and the lab test results only prove the validity of the solution for those masks.
Is my mask eligible for sanitation? Can I sanitise a cotton mask that I made myself?
As explained above, there are different types of masks available on the market and we assume that UVC light is equally effective at disinfecting all of them. However, tests have only been performed on some types of N95 masks, and we have no data concerning effectiveness of the process on the other mask types or the lifespan of those after disinfection.
We strongly recommend laundering your cloth face masks instead of using UV-C light. Washing at 90ºC in the washing machine is an effective method for killing the virus, and cloth masks (cotton and others) are suitable for this.
Why should I decontaminate N95 masks?
Most N95 masks are the most protective masks out there but are designed for one use only. This is based on the premise that there is enough protective material available, masks are relatively cheap and they are made of non-woven material that can weaken with use. However, the current circumstances are so unique that PPE is in extremely high demand and, in fact, extremely scarce around the world. Therefore, extending the lifetime of this protective equipment by disinfecting it has already become crucial to being able to fight the disease in the best possible conditions for as long as possible.
What if I don't have time to decontaminate my mask right now?
We encourage you to disinfect the mask immediately after you have taken it off your face. This is to avoid spreading the virus through unattended, contaminated equipment. If you cannot do it right away or if there is no-one to do it for you, simply dispose of it safely (normally in a closed, double bagged trash bin).
Where can I buy the product?
The COVID-19 decontamination toolkit is not a commercial product. It is a set of instructions for building your own disinfection device with readily available parts that you must source yourself. If you don’t think you can assemble one, seek help from others (it is an easy process!), for instance in one of the FabLabs or maker spaces in your city.
Credit
While this project was led by FROLIC studio and all of its team members, many volunteers and organisations have given their support. Here they are listed:
Individuals
Hülya Uluğut: Medical consultation
Ramsés Cabello: Graphic design
Fei Kwok: Design research
Adam Little: Design research and facilitation
Belinda Deschamps: Design Research and UX design around the protocol
Julia Kulgavchuk: UX design around the protocol
Saskia Herrmann: Design research
Mariëlle van Aart: Design research
Elena Gianni: Design research
Julius Ingemann: Design research
Benno Bas: Industrial design
Pim Swinkels: Math for online calculator
Ye Yang: Design research
Nunzia Coco: Design research
Dolinde van Beek: Online calculator
Chris Rockett: UV-C light consultation
Companies
HygCen: Quality Assurance Testing for Medical Devices, Germany
YSDS: Transport and logistics
IKEA Group: Donation of KUGGIS boxes
EdenFrost Communications: Social media
The Humblebrag: Communication Partner
Light Sources Inc.: UV-C light consultation
De Zwijger: Network and marketing support
Van Diepen Van der Kroef Advocaten: Legal advise
International Ultraviolet Association: Guidance on UV-C light
Plastic2print: Donation of 3d printing filament